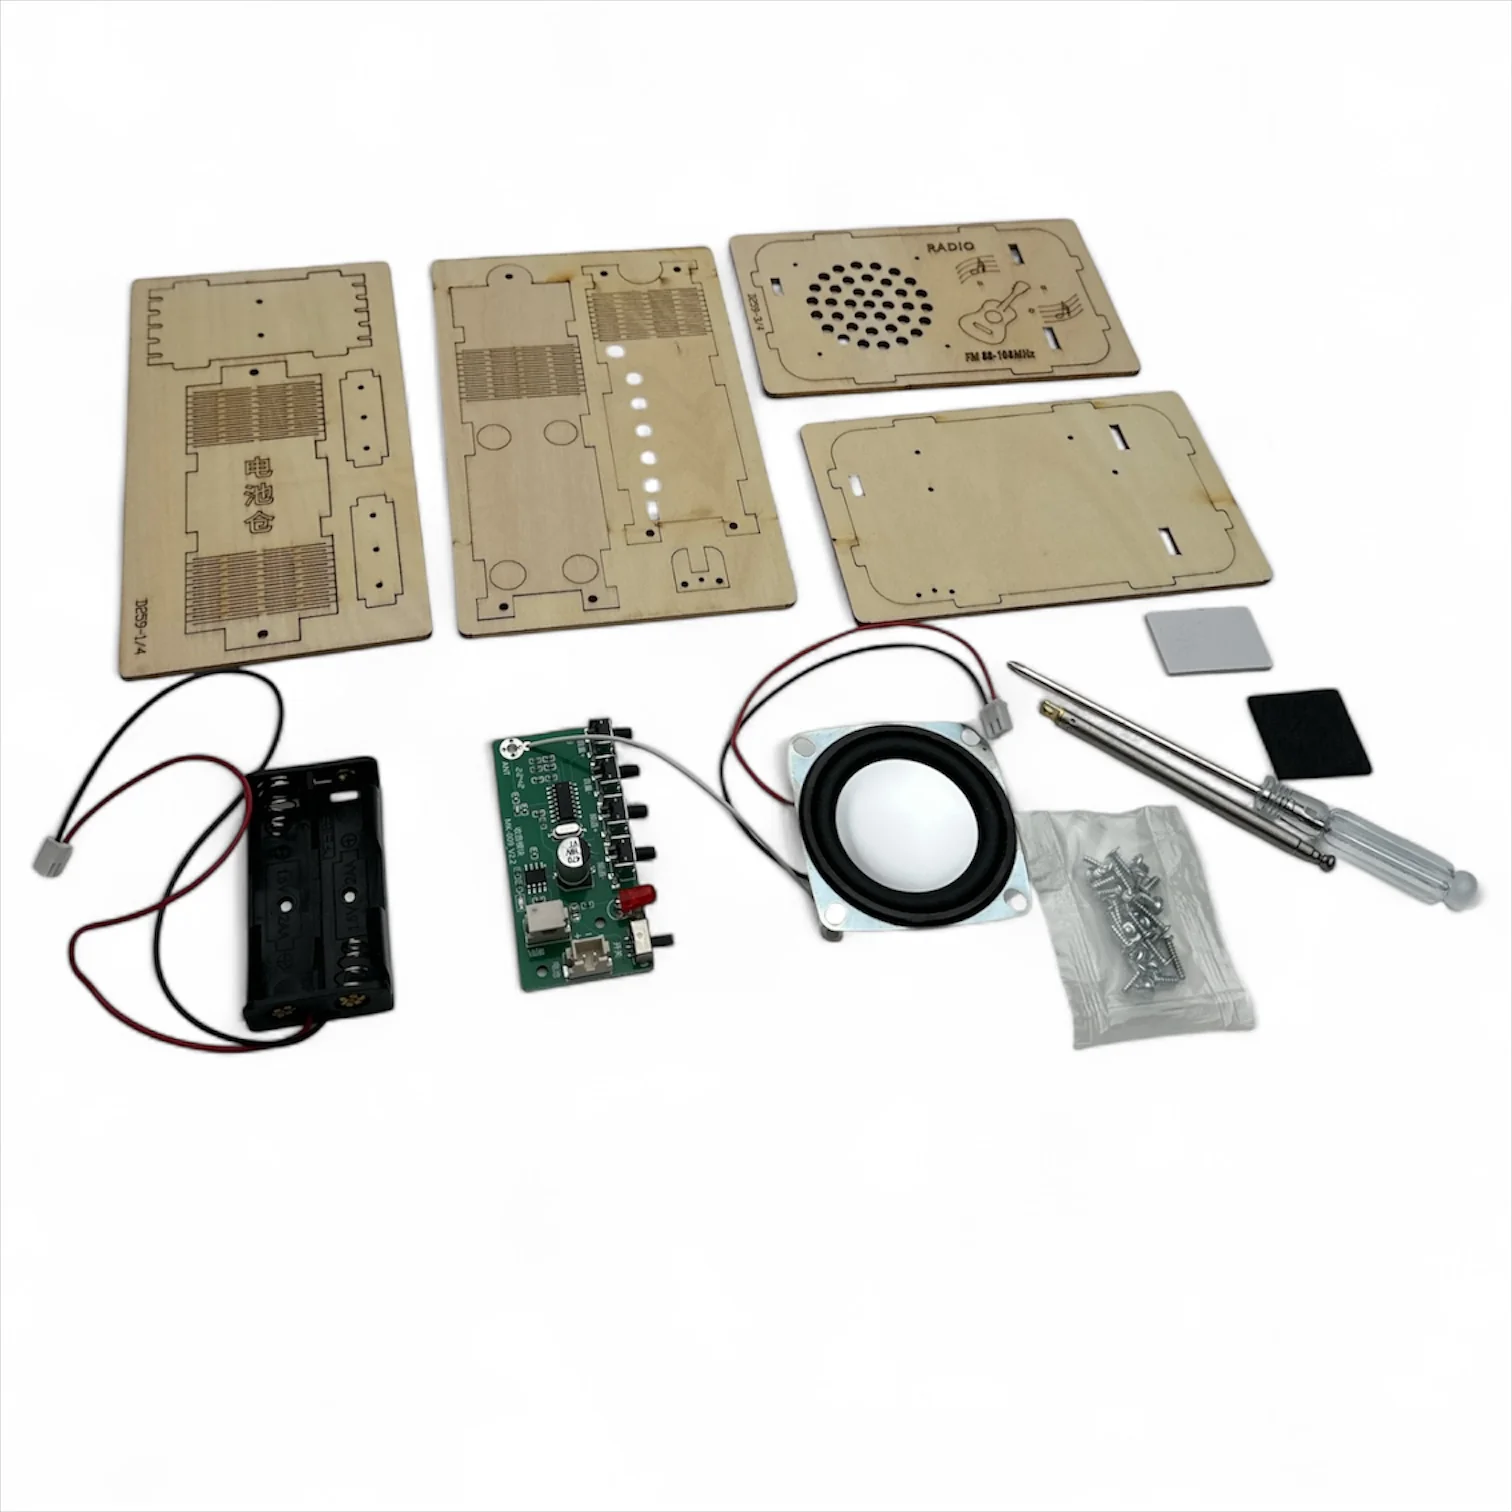
DIY Radio kit no soldering
This is an FM Radio Amplifier Mono FM Music Player, designed as a handmade wooden assembly experimental equipment. It features a wooden casing, providing a primitive and rustic design for an FM radio. It can play music from FM radio stations, with a 3W 4ohm speaker that produces clear and loud sound. The use of screws for fixation ensures that the installation process is convenient and simple.
- Step 1: Remove all available boards from the 4 wooden boards. Be careful not to damage the wooden boards.
- Step 2: Fix 1 piece of 3W 4ohm Speaker on a Wooden Board using 4 pieces of M2*4mm Screws.
- Step 3: Attach double-sided adhesive to the back of the FM Radio Receiver Module.
- Step 4: Attach and fix the FM Radio Receiver Module on another Wooden Board using 4 pieces of M2*7mm Screws. Note: Loosen the screws slightly and do not over-tighten them.
- Step 5: Fix 1 piece of AA2 Battery Box on another Wooden Board using 2 pieces of M24mm Screws.
- Step 6: Join the wooden boards from the battery box and FM receiver. Connect the battery socket while placing the wires in the wiring slot.
- Step 7: Fix the FM Antenna gasket using 2 pieces of M2*6mm Screws.
- Step 8: Fix the FM Antenna and gasket from the FM Radio Receiver Module using 1 piece of M2*7mm Screw.
- Step 9: Insert the fixed small bracket.
- Step 10: Connect the 3W 4ohm Speaker to the FM Radio Receiver Module.
- Step 11: Join the wooden boards from the FM receiver and speaker.
- Step 12: Fix the TOP wooden board using 2 pieces of M2*7mm Screws. Note: Align each installation hole.
- Step 13: Slowly bend the wooden board to avoid breaking and then fix it using 2 pieces of M2*10mm Screws.
- Step 14: Fix the Bottom wooden board using 2 pieces of M2*7mm Screws.
- Step 15: Slowly bend the wooden board to avoid breaking and then fix it using 1 piece of M2*10mm Screw.
- Step 16: Install 2 pieces of AA Battery.
- Step 17: Fix the last wooden board using 1 piece of M2*7mm Screw.
- Step 18: Slowly bend the wooden board to avoid breaking and then fix it using 1 piece of M2*7mm Screw.
- Step 19: Install 4 pieces of Black Sponge Base on the Bottom wooden board.
Product Information
Product Information
Shipping & Returns
Shipping & Returns
Description
This is an FM Radio Amplifier Mono FM Music Player, designed as a handmade wooden assembly experimental equipment. It features a wooden casing, providing a primitive and rustic design for an FM radio. It can play music from FM radio stations, with a 3W 4ohm speaker that produces clear and loud sound. The use of screws for fixation ensures that the installation process is convenient and simple.
- Step 1: Remove all available boards from the 4 wooden boards. Be careful not to damage the wooden boards.
- Step 2: Fix 1 piece of 3W 4ohm Speaker on a Wooden Board using 4 pieces of M2*4mm Screws.
- Step 3: Attach double-sided adhesive to the back of the FM Radio Receiver Module.
- Step 4: Attach and fix the FM Radio Receiver Module on another Wooden Board using 4 pieces of M2*7mm Screws. Note: Loosen the screws slightly and do not over-tighten them.
- Step 5: Fix 1 piece of AA2 Battery Box on another Wooden Board using 2 pieces of M24mm Screws.
- Step 6: Join the wooden boards from the battery box and FM receiver. Connect the battery socket while placing the wires in the wiring slot.
- Step 7: Fix the FM Antenna gasket using 2 pieces of M2*6mm Screws.
- Step 8: Fix the FM Antenna and gasket from the FM Radio Receiver Module using 1 piece of M2*7mm Screw.
- Step 9: Insert the fixed small bracket.
- Step 10: Connect the 3W 4ohm Speaker to the FM Radio Receiver Module.
- Step 11: Join the wooden boards from the FM receiver and speaker.
- Step 12: Fix the TOP wooden board using 2 pieces of M2*7mm Screws. Note: Align each installation hole.
- Step 13: Slowly bend the wooden board to avoid breaking and then fix it using 2 pieces of M2*10mm Screws.
- Step 14: Fix the Bottom wooden board using 2 pieces of M2*7mm Screws.
- Step 15: Slowly bend the wooden board to avoid breaking and then fix it using 1 piece of M2*10mm Screw.
- Step 16: Install 2 pieces of AA Battery.
- Step 17: Fix the last wooden board using 1 piece of M2*7mm Screw.
- Step 18: Slowly bend the wooden board to avoid breaking and then fix it using 1 piece of M2*7mm Screw.
- Step 19: Install 4 pieces of Black Sponge Base on the Bottom wooden board.